Географическая Карта Моделирования Бизнес процесса. Гео карта Google esrth. Kmlсправочник
 Скачать 7.61 Mb. Скачать 7.61 Mb.
|

|
Overlay --> Description This is an abstract element and cannot be used directly in a KML file. Elements Specific to Overlay Color values are expressed in hexadecimal notation, including opacity (alpha) values. The order of expression is alpha, blue, green, red (aabbggrr). The range of values for any one color is 0 to 255 (00 to ff). For opacity, 00 is fully transparent and ff is fully opaque. For example, if you want to apply a blue color with 50 percent opacity to an overlay, you would specify the following: Note: The This element defines the stacking order for the images in overlapping overlays. Overlays with higher Defines the image associated with the Overlay. The Extends Extended By > Syntax ... ... ... ... Description The element allows you to geographically locate a photograph on the Earth and to specify viewing parameters for this PhotoOverlay. The PhotoOverlay can be a simple 2D rectangle, a partial or full cylinder, or a sphere (for spherical panoramas). The overlay is placed at the specified location and oriented toward the viewpoint. Because is derived from The URL for the PhotoOverlay image is specified in the For more information, see the "Topics in KML" page on PhotoOverlay. Elements Specific to PhotoOverlay Adjusts how the photo is placed inside the field of view. This element is useful if your photo has been rotated and deviates slightly from a desired horizontal view. Defines how much of the current scene is visible. Specifying the field of view is analogous to specifying the lens opening in a physical camera. A small field of view, like a telephoto lens, focuses on a small part of the scene. A large field of view, like a wide-angle lens, focuses on a large part of the scene. Angle, in degrees, between the camera's viewing direction and the left side of the view volume. Angle, in degrees, between the camera's viewing direction and the right side of the view volume. Angle, in degrees, between the camera's viewing direction and the bottom side of the view volume. Angle, in degrees, between the camera's viewing direction and the top side of the view volume. Measurement in meters along the viewing direction from the camera viewpoint to the PhotoOverlay shape. The field of view for a PhotoOverlay is defined by four planes, each of which is specified by an angle relative to the view vector. These four planes define the top, bottom, left, and right sides of the field of view, which has the shape of a truncated pyramid, as shown here: 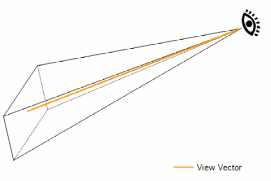 The following diagrams show the four field-of-view angles within this pyramid: 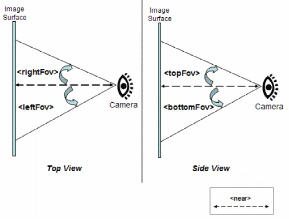 For very large images, you'll need to construct an image pyramid, which is a hierarchical set of images, each of which is an increasingly lower resolution version of the original image. Each image in the pyramid is subdivided into tiles, so that only the portions in view need to be loaded. Google Earth calculates the current viewpoint and loads the tiles that are appropriate to the user's distance from the image. As the viewpoint moves closer to the PhotoOverlay, Google Earth loads higher resolution tiles. Since all the pixels in the original image can't be viewed on the screen at once, this preprocessing allows Google Earth to achieve maximum performance because it loads only the portions of the image that are in view, and only the pixel details that can be discerned by the user at the current viewpoint. When you specify an image pyramid, you also modify the |